Repair a Car Bumper That Stays Repaired
You can repair a car bumper crack at home when the bumper cover is not badly warped, torn away from its mounts, or damaged around safety parts. The durable approach is simple: identify the plastic, stop the crack from spreading, reinforce the back side, then use the right welding or flexible adhesive system before sanding and painting.
A quick cosmetic patch may hide damage for a while. A repair that holds up needs to account for bumper flex, road vibration, and changing temperatures. Small cracks, scuffs, and splits are often good DIY candidates; loose mounting tabs, major holes, severe deformation, or damage near sensors and the impact absorber deserve a professional inspection or replacement.
DIY materials commonly cost about $60 to $120, compared with $500 to $1,500 for a shop replacement and paint. The key is not using more filler – it is building a sound repair beneath the finish.
I am Brian Blanc, and I have spent nearly 30 years restoring vehicle appearance through hands-on paintless dent repair and mobile auto-body work in the East Bay. In this guide, I will show you how to repair car bumper damage with methods that prioritize a clean finish and lasting strength.

Simple guide to repair car bumper:
Assessing Bumper Damage and Identifying Plastic Types
Before picking up any tools, we need to inspect the structural integrity of the bumper and identify the underlying polymer. Treating all bumper plastics identically is the single most common reason DIY repairs fail prematurely.
Repair vs. Replacement: Evaluating the Severity
Not every split or crack can safely be repaired in your driveway. Modern bumpers are engineered systems designed to manage impact energy and house sensitive electronics. When evaluating your vehicle, use these guidelines:
- DIY Repairable: Hairline cracks, minor splits under 6 inches in length, localized punctures, scuffs, and small tears where the plastic edges align flush without tension.
- Replacement Required: Broken mounting tabs or clips that secure the fascia to the fender, large missing chunks of material, spiderweb structural cracking across the entire fascia, or severe heat warping.
- Safety Critical Checks: If the underlying foam impact absorber is crushed, or if a crack passes directly over modern Advanced Driver Assistance Systems (ADAS) radar and sonar sensors, the bumper requires professional recalibration or complete replacement. Review The Complete Guide to Auto Body Repair Costs to understand how professional structural repairs are priced.
Identifying Bumper Plastics: PP, TPO, and ABS
Automotive bumpers are molded from specific synthetic blends. Applying the wrong welding rod or adhesive chemistry means the repair will separate the moment your vehicle hits highway speeds or hits a dip in the road.
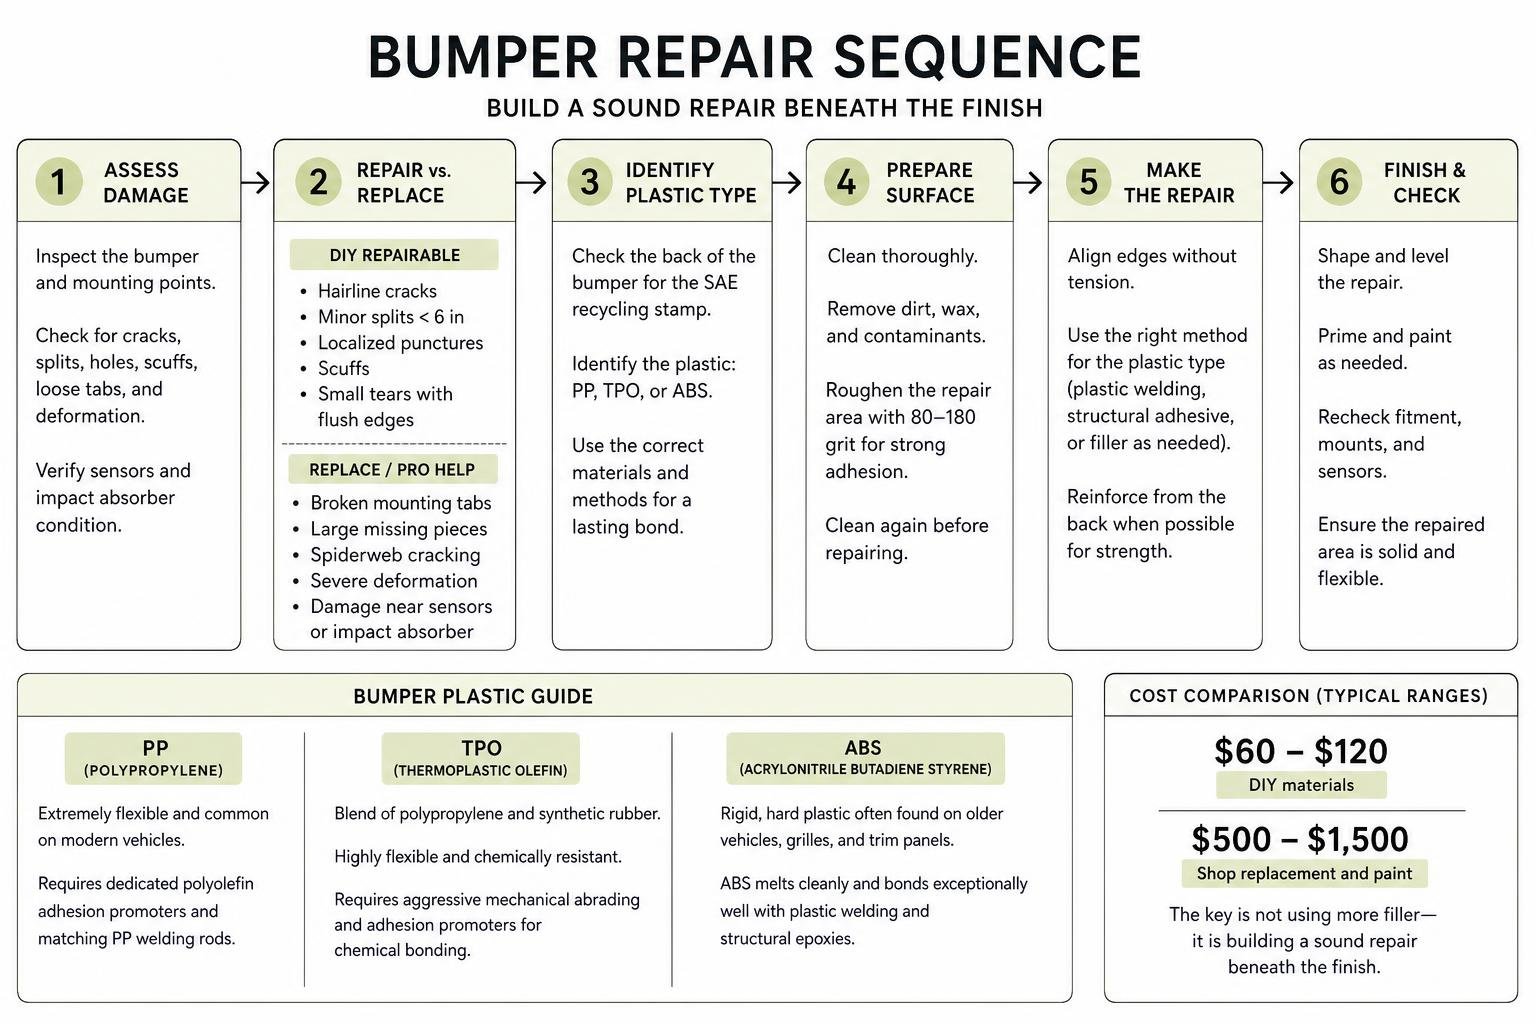
To identify your bumper material, look at the back of the bumper cover for the molded Society of Automotive Engineers (SAE) recycling stamp:
- PP (Polypropylene): Extremely flexible and common on modern vehicles. It requires dedicated polyolefin adhesion promoters and matching PP welding rods.
- TPO (Thermoplastic Olefin): A blend of polypropylene and synthetic rubber. Highly flexible, chemically resistant, and requires aggressive mechanical abrading and adhesion promoters for chemical bonding.
- ABS (Acrylonitrile Butadiene Styrene): Rigid, hard plastic often found on older vehicles, grilles, and trim panels. ABS melts cleanly and bonds exceptionally well with plastic welding and structural epoxies.
- PUR / RIM (Polyurethane): A thermoset plastic that does not melt when heated. It cannot be plastic welded with heat rods; it must be repaired using high-strength two-part structural flexible epoxy adhesives.
Understanding these material differences is essential for long-term success. Read our guide on Plastic Bumper Repair: The Easy Way to Save Your Car’s Face for deeper insights into thermoplastic behavior.
Proven Techniques to Repair Car Bumper Cracks and Splits
Restoring a cracked bumper requires establishing a mechanical and molecular bridge across the split. A simple layer of body filler applied over a split will crack within weeks because bumpers naturally flex with vehicle movement, road vibration, and temperature changes.
Must-Have Materials to Repair Car Bumper Plastics at Home
Gather your equipment before beginning the repair. Professional-grade results require the right combination of tools:

- Hot Stapler / Plastic Welding Gun: A 100W to 220W handheld tool to embed stainless steel reinforcement staples across the split.
- Plastic Welding Rods: Material-matched rods (PP, TPO, or ABS) for thermal fusion.
- Reinforcement Material: Stainless steel woven wire mesh screen (5.9 x 7.9 inch sheets).
- Structural Chemical Adhesive: Two-part flexible plastic repair epoxy, such as J-B Weld Plastic Bonder or equivalent two-part urethane adhesives.
- Abrasives: Quality sandpaper in 80, 180, 320, 400, and 600 grits, plus 2000-grit for finish wet sanding.
- Chemical Cleaners & Prep: Isopropyl alcohol or VOC-compliant wax and grease remover, and a dedicated polyolefin adhesion promoter.
- Finishing Compounds: Flexible polyester bumper glaze/filler, high-build flexible primer, OEM color-matched basecoat, and 2K urethane clear coat.
- Personal Protective Equipment (PPE): Nitrile gloves, safety goggles, and an organic vapor respirator mask.
| Repair Method | Durability vs Base Plastic | Setup Cost | Ideal Damage Type | Flexibility Retention |
|---|---|---|---|---|
| Thermal Plastic Welding | Up to 100% (Molecular Fusion) | $30 – $70 (Kit) | Deep tears, long cracks, structural splits | High (Maintains original flex) |
| Hot Staple Reinforcement | High (Mechanical Bridge) | $25 – $50 (Gun & Staples) | High-stress splits, mounting edges | Moderate (Staples resist tensile pull) |
| Two-Part Epoxy Adhesive | ~33% of welded tensile strength | $15 – $35 (Syringe/Kit) | Punctures, thermoset PUR plastics | Moderate to High (With flexible additives) |
Plastic Welding vs. Chemical Epoxy Kits
While over-the-counter epoxy kits like J-B Weld Plastic Bonder provide strong surface bonding, plastic welding is significantly more durable because it melts and fuses the plastic molecules into a single continuous piece. Thermal fusion results in a repair that is roughly 3x more durable than standard adhesive-only patches on thermoplastics.
For severe rips and high-stress points, combining both methods yields the best outcome: use hot staples and thermal welding on the structural backside, followed by structural epoxy or flexible filler on the cosmetic front side. For detailed torn edge techniques, reference the step-by-step instructions in How to Repair Ripped Bumper: Step-by-Step [DIY Save $500] – RapidRepair.blog.
Step-by-Step Structural Bumper Crack Repair
Achieving a lasting repair requires proper surface preparation. Follow these steps to prepare the substrate, relieve structural stress, and build a lasting reinforcement bridge.
Stopping Crack Propagation and V-Grooving

- Clean the Substrate: Wash both sides of the bumper thoroughly with car wash soap and water. Follow up with a dedicated VOC-compliant wax and grease remover or isopropyl alcohol to remove road grime, tar, and silicone residues.
- Stop-Drill the Crack Ends: Locate the exact termination point of every crack. Using a 1/8-inch drill bit, drill a clean hole through the bumper directly at the tip of each crack. This stop-drill technique eliminates localized stress concentration points, preventing the crack from migrating farther down the panel when the bumper flexes.
- Create the V-Groove Channel: Take a rotary tool with a burr bit, a die grinder, or 80-grit sandpaper wrapped around a hard block, and grind a 45-degree bevel along the entire length of the crack on both the front and rear surfaces. This creates a “V” shaped channel. V-grooving doubles the contact surface area, allowing the welding rod or epoxy to establish a deep, mechanical bond with full penetration instead of sitting weakly on top of the seam. For an in-depth visual breakdown of stress relief channels, consult How to Fix a Cracked Bumper on Your Car [Pro DIY Guide] – EngineerSkill.blog.
Backside Reinforcement and Structural Bonding
To build a permanent repair, remove the bumper cover from the car to access the rear side:
- Align the Seam: Realign the torn edges on the cosmetic front face, securing them with aluminum body tape or heavy-duty masking tape so the bumper holds its original contour.
- Embed Stainless Steel Hot Staples: On the backside, use your hot stapler gun to insert wave-style stainless steel staples perpendicular across the seam every 1 to 1.5 inches. Press the heated staple into the plastic until it sits halfway through the material thickness, release the trigger, and hold it steady for 3 seconds while the plastic re-hardens. Clip the exposed wire pins with side cutters.
- Melt Stainless Steel Mesh: Cut a strip of stainless steel woven wire mesh covering the crack with a 1-inch border on all sides. Lay the mesh over the seam, and use the flat ironing tip of your plastic welder to press and melt the mesh into the substrate until the plastic oozes through the wire grid.
- Tack Weld the Plastic: Feed a plastic welding rod matching your bumper code (e.g., PP or TPO) into the heated nozzle or under the flat welding tip, working the melted rod into the V-groove channel. Allow the weld to cool naturally for 20 to 30 minutes. Do not quench with water, as rapid cooling makes polymers brittle.
If the damage also involves pushed-in dents, address those shapes first using controlled heat as detailed in our guide on Plastic Bumper Dent Removal: The Hairdryer and Push Method Explained.
Sanding, Priming, and Painting for a Seamless Finish
Once structural strength is restored from the back, shift attention to the exterior surface for leveling, profiling, and paint blending.
Progressive Sanding and Flexible Filler Application
- Initial Leveling: On the front side of the bumper, grind or sand down any protruding weld material or ridge lines using 80-grit sandpaper. Feather the original paint outward 2 to 3 inches beyond the repair zone using 180-grit sandpaper to create a smooth, tapered transition.
- Apply Adhesion Promoter: Clean away all sanding dust using clean compressed air and a tack cloth. Spray two light coats of polyolefin adhesion promoter over all bare, exposed plastic surfaces. Allow it to flash-dry for 5 to 10 minutes before applying filler.
- Mix and Apply Flexible Bumper Filler: Use a two-part flexible polyester glaze or epoxy repair filler. Mix the hardener thoroughly per instructions. Apply a firm “tight coat” first to wet-out the scratch profile and displace micro-air pockets, then apply an even layer slightly higher than the surrounding panel.
- Cure and Contour Sand: Let the flexible filler cure for 15 to 20 minutes at room temperature (70°F to 75°F). Block-sand the filler flush using 180-grit abrasive, followed by 320-grit sandpaper to eliminate scratch marks. Inspect for pinholes; if found, apply a thin skim coat of glazing putty and sand smooth with 400-grit wet/dry paper.
Paint Color Matching and Clear Coat Blending
- Find the OEM Paint Code: Locate your vehicle’s factory paint color code on the driver’s door jamb sticker, under the hood, or in the spare tire well. Order factory color-matched basecoat and a dedicated flexible 2K urethane clear coat in aerosol cans.
- Prime the Repair: Mask off surrounding lights, trim, and adjacent body panels. Apply 2 to 3 coats of flexible high-build primer over the repaired area, extending slightly past the filler edge. Allow 10 minutes of flash time between coats. Once dry, wet-sand the primer with 600-grit paper until silky smooth.
- Apply Basecoat: Wipe the panel with a tack cloth. Spray the basecoat in light, uniform passes, holding the can 8 to 10 inches away. Apply 2 to 3 coats until full color coverage is achieved over the primer, feathering each coat an inch farther into the surrounding clear coat to create a seamless color transition.
- Clear Coat and Polish: Apply 2 wet coats of 2K urethane clear coat over the basecoat, extending into the blend panel. Allow the clear coat to cure for 48 hours. Remove any minor orange peel or overspray lines by wet-sanding with 2000-grit paper, then buff and polish the area with a dual-action polisher and compound to bring out a factory gloss. Learn more about paint budgets in our Bumper Scuff Repair Cost Guide: From Cheap DIY Fixes to Professional Paint Jobs.
Frequently Asked Questions About Bumper Restoration
Can I repair car bumper cracks without removing the bumper cover?
While minor surface paint scuffs or small hairline stress marks can be addressed while the bumper is mounted on the vehicle, structural crack repair requires removing the bumper cover. Without access to the backside, you cannot stop-drill the crack ends, embed stainless steel staples, or melt reinforcing wire mesh into the substrate. Skipping backside reinforcement means road vibrations and wind resistance will cause the crack to reopen over time.
How much money do you save with DIY bumper repair?
Completing a DIY bumper repair typically costs between $60 and $120 for materials (including hot staples, plastic rods, adhesion promoter, flexible filler, sandpaper, and color-matched paint). In contrast, professional collision shops routinely charge between $500 and $1,500 for a full bumper cover replacement and paint blending. If your repair is purely cosmetic or structurally sound, tackling it yourself delivers significant financial savings.
Will the paint crack over the repaired plastic area?
Automotive paint will only crack if you use rigid body fillers (like standard fiberglass bondo) or apply non-flexible primers. Car bumpers expand, contract, and flex with temperature changes and road impacts. By using specialized flexible polyester repair fillers, polyolefin adhesion promoters, and automotive-grade flexible primers with elastomeric properties, the paint film retains the flexibility needed to stay bonded without cracking.
Conclusion
Restoring a cracked or damaged car bumper cover at home is entirely achievable when you follow the right structural methods. By correctly identifying your bumper’s plastic type, stop-drilling crack tips to prevent spread, reinforcing the rear substrate with hot staples or wire mesh, and finishing with flexible fillers and OEM-matched paint, you can achieve a durable, factory-grade result for a fraction of the cost of a body shop replacement.
If your bumper has severe structural deformation, torn mounting tabs, misaligned body lines, or if you prefer a factory-level finish without spending your weekend sanding, our team is here to help. At Dent Erasers LLC, we provide on-site mobile paintless dent repair and cosmetic restoration across Contra Costa County—including Concord, Walnut Creek, Antioch, and surrounding communities. Schedule your expert plastic bumper repair with us today for fast, affordable, high-quality results.